Building Soundproof Walls
If you are faced with a real soundproofing problem such as a live band or other sound source as intense, you will have to be prepared to spend thousands of dollars and use prefabricated wall system panels designed for sound levels this intense.
Anything short of sound levels that high, then the following system is an excellent choice.
Soundproof the existing wall as per the previous example This time use a 4" wide steel track for the floor and ceiling and install the studs (2" wide) using the staggered stud system again holding the new wall off the existing wall. Install the studs on the back edge first, laminate the studs with sheets of 1" styrofoam using construction adhesive.
Install the studs on the front side of the plate (side closest to the finished room), and insulate the wall with fiberglass.
Note: If you can afford the space, upgrade to a 6" wide floor track and 3-1/2" studs for even more sound proofing, all else remains the same.
Now hang your soundboard as we outlined on the previous page.
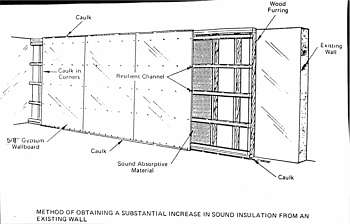
At this point we are going to install a resilient metal channel horizontally.
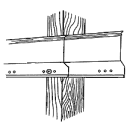
a resilient channel looks like a top hat from the side.


Click on pic for larger view
This diagram shows the channel attached directly to a stud, you will have soundboard on top of the stud so yours will be attached thru the soundboard.
The channel acts as a vibration dampening device. The drywall is then attached to the two flanges on the face of the channel. When installing the channel onto the soundboard or studs, we use an adhesive acrylic caulking in a continuous bead on the back edge not only to give a better grip but also to act as an additional vibration buffer.
One piece goes 1" off the floor then every 24" up the wall to within 1" of the ceiling.
5/8" type "X" fire rated drywall has much better sound deadening properties than 1/2" reg drywall. The cost is not that much more so I recommend you use 5/8"X. Attach it using construction adhesive and a few screws to hold it in place until the adhesive dries. Avoid using too many screws...this is a path for sound to travel, 6-8 per 4'x8' panel of drywall is enough to hold it.
When installing the drywall do not fit it tight into the ceiling, corners or floor. Hold it off at least 1/4" and use an acrylic caulking to fill those gaps. The caulking acts as a flexible buffer for sound vibration so that it minimizes the sound transfer.
Caulk an fill ALL openings, around outlet and switch boxes, light fixtures etc. NO Cracks or holes left uncaulked!
Tape and finish the drywall using normal procedures->Finishing Drywall
Paint the new drywall using the HY-TECH insulating additive in paint or their Acousti-Coat, sound deadening paint.
Soundproofing Ceilings
The same application outlined here can be applied to ceiling as well. When attaching the drywall use both glue AND screws to insure a more secure bond.
Related:
Introduction to Sound Control
|
Need Supplies?
Shopping
Directory

Next time you Paint You Can also INSULATE!
Here's How
Get Your How-To
Books
Videos
and Tools at

|


